The Control Bar in Smaart SPL or SPL Mode in Smaart Suite consists of a button bar and optional clock display. In Smaart Suite you also have three mode switch buttons above the clock. The clock is visible by default but can be hidden by un-checking the Clock command (SPL Meter command in Smaart Suite) in the View menu or pressing [K] on your keyboard. To change it from a 12-hour clock to 24-hour, select 24-Hour Clock from the General tab of the Preferences dialog, accessible by navigating to Options > Preferences > General or via the [Alt/Option] + [O] hot key. You can also toggle Show Date in Clock from this menu if you'd like the displayed time to be larger.
Button Functions
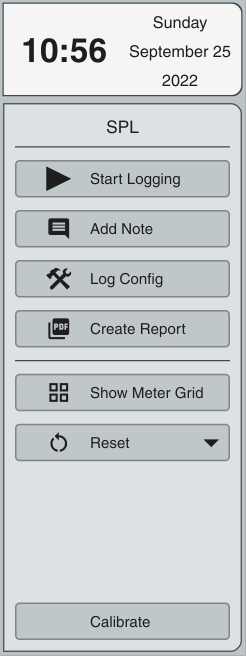
SPL Mode Control Bar.
Start Logging, as the name might imply, starts writing sound level data from all inputs selected for logging to log files and makes their measurement data available to the history and statistical sound level displays. When logging is active, this button turns red and the label text changes to “Stop Logging.”
When logging is active and the Source selection on the sound level history graph(s) is set to a live input being logged, clicking the Add Note button pops up a dialog where you can type a note to be added to the log file for the selected input.
Log Config opens the Log Config dialog where you can select the inputs that you want log when logging is active.
Create Report creates a report file with summary information about the selected Source (i.e., a log file or a live input currently being monitored) for the Sound Level History graph(s). The report can comprise the entire file or live monitoring session or just a specific time range selected in the history display. When you click the Generate Report button, a dialog window opens where you can supply information such as the name of the event, venue, personnel, etc. All fields are optional but any information you provide will be included in the report file, along with statistical sound levels (L10, L50, L90 and Max) for each sound level metric being monitored, alarm levels, alarm violations and overloads, and information about the input being logged and the software version. When the Open file location when done check box is checked in the SPL Summary Report dialog, Smaart will automatically open the folder where the file was written upon completion.
The Show Meter Grid button opens the SPL Meters window. Note that this button echoes the functionality of the SPL Meters command in the View menu.
The Reset button opens a menu with four options. These are global actions that affect all configured SPL, Leq, and exposure meters in both the main window and the SPL Meters window as applicable, regardless of whether a given meter is currently visible or not. If logging is in progress when any of these actions are invoked, log events are generated for applicable metrics.

SPL Buffer Reset options.
Reset Max Levels globally clears all previous maximum measured levels for all sound level meters regardless of whether they are currently visible or not.
Reset Leq Buffers flushes the averaging buffers and restarts averaging for all equivalent sound level (Leq) measurements currently in progress.
Reset Exposure restarts the sound exposure history for all input channels being monitored.
Reset All all executes all three of the commands above.
Calibrate calls the Amplitude Calibration dialog, Smaart SPL's primary interface for setting up input sources for accurate sound level measurements. The Amplitude Calibration dialog is also accessible from the Config menu and the Input Config page of the I-O Config dialog.