The I-O Config command (keyboard shortcut [Alt/Option] + [A]) opens the I-O Config dialog. Here you can select, name, and calibrate any input/output devices and individual channels to use with Smaart. Live metering is available for any selected input channels as well as controls if Smaart detects an interface with direct integration.
A Note on Windows drivers:
If you have both Wave and ASIO drivers installed for an I-O device with more than two channels, it will typically show up as one ASIO device and multiple Wave devices. This is due to a technical limitation of Waves drivers; They can only support two input channels per I-O device. You can have Smaart hide either ASIO or Wave drivers via checkbox in Audio preferences – If both boxes are un-checked, all drivers will be hidden.
Input Config
The Inputs tab in I-O Config consists of two tables: The upper table lists all input devices for which Smaart has detected drivers, and the lower table lists the input channels associated with the currently selected device. Users of previous versions of Smaart may note that Smaart’s global Sample Rate and Buffer Size are no longer present in I-O Config, but can instead be set from Options > Preferences > Audio.
Configuring Input Devices
The input devices table is comprised of four columns, labeled Use, API: Driver Name, Friendly Name, and Status.

The Input tab of the I-O Config dialog.
To select a device for use in Smaart, click its check box in the Use column.
The API : Driver Name column lists input devices by the names that their drivers report to the operating system. On Mac OS X, all devices will use the CoreAudio API. Windows machines may have ASIO and Wave API devices and some devices may appear as both types.
Clicking on any entry in the Friendly Name column allows you to alter the displayed name for that input. Press the [Enter] key after editing to apply any changes.
Status – A device’s status will either be OK if Smaart was able to connect to it successfully or N/C if Smaart is unable to connect. This can mean that Smaart remembers the device, but it is not currently connected. Alternatively, if the device is present and connected, this can be indicative of a hardware or software problem preventing Smaart from communicating such as a hung device driver, a loose cable, or perhaps the device has become unresponsive and needs a reboot.
You can remove an N/C device from the list by selecting it and clicking the Remove button below the devices table.
On Windows, there is a Refresh button to the left of Remove that will prompt Smaart to re-check for new device connections (and disconnections). The MacOS version of Smaart performs this check continuously while open, so this button isn’t present.
Configuring Input Channels
When an input device is selected for use, its output channels are listed in the channels table below. When multiple devices are selected for use, a new tab is added to this table for each device. This table has 7 columns, the rightmost of which contains a live signal level meter for selected each input.
The checkboxes in the Use column work the same as in the devices table above: All checked inputs will be used and all unchecked inputs will be ignored. Selecting an input device for use automatically creates a new Spectrum engine using its Friendly Name.
The Channel (Ch) column lists channels by number as reported by the driver.
The Channel Name column lists each input as named by its driver. These are not editable.
Clicking on an input’s Friendly Name allows you to change its name as displayed within Smaart. Pressing the [Enter] key applies these changes and selects the next input on the list.
The numbers in the Cal. Offset column represent the difference in decibels (dB) between each input channel’s full-scale digital Amplitude and its calibrated level. A calibration offset of zero means the input is uncalibrated and set to digital Full Scale (dBFS). When an input is calibrated for SPL measurement, you will see a positive number (typically > 100) in this column. While you can edit these calibration offset values manually, these are ideally populated by running the calibration routine within the Calibration dialog.
The Mic Correction Curve selectors assign microphone correction curves to input channels. This feature is not present in Smaart SPL.
Below the channels table are two buttons:
The Clear Settings button will clear out any calibration offsets and microphone correction curves while resetting inputs’ friendly names to their driver-reported default names. (A warning message pops up first in case you click the button by accident.)
The Calibrate button opens the Amplitude Calibration dialog with the current input selected for calibration.
If the selected device has direct Smaart integration (such as the Smaart I-O, Roland® OCTA-CAPTURE™, or Audient® EVO 4/8/16), an additional checkbox labeled Gain Tracking appears. When this box is checked, Smaart will adjust the calibration offset values for the device’s calibrated inputs in response to gain changes. The accuracy of these adjustments is dependent upon the accuracy of the input device's gain steps, which can vary between products (or even from one device of a specific model to another). Smaart can control only one OCTA-CAPTURE or EVO device at a time.
Output Config
The Output page of the I-O Config dialog controls routing for Smaart's signal generator. Much like in the Inputs page, this page’s upper table lists all available output devices and its lower table lists all available output channels for the currently selected device.
Configuring Output Devices
At the top of the Output tab is a table comprised of four columns labeled Use, API: Driver Name, Friendly Name, and Status.
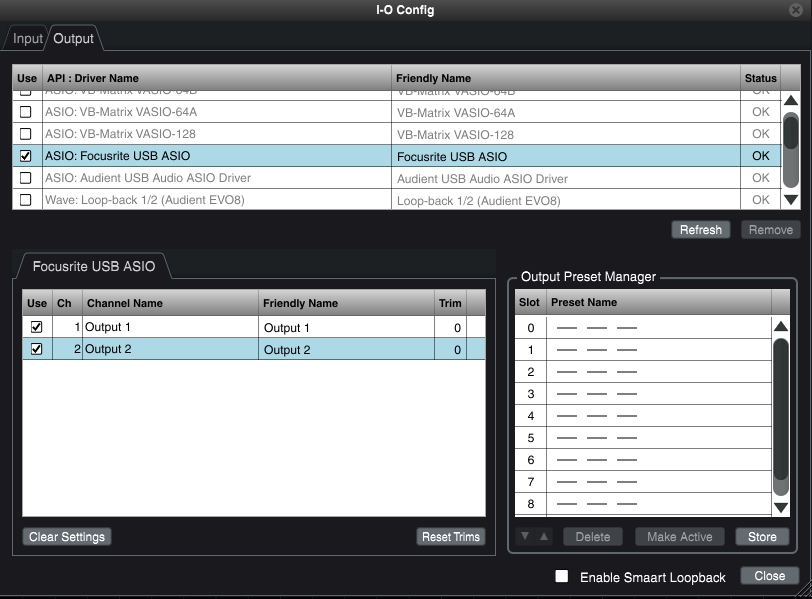
The Output tab of the I-O Config dialog.
To select a device for use in Smaart, click its check box in the Use column.
The API : Driver Name column lists input devices by the names that their drivers report to the operating system. On Mac OS X, all devices will use the CoreAudio API. Windows machines may have ASIO and Wave API devices and some devices may appear as both types.
Clicking on any entry in the Friendly Name column allows you to alter the displayed name for that input. Press the [Enter] key after editing to apply any changes.
Status – A device’s status will either be OK if Smaart was able to connect to it successfully or N/C if Smaart is unable to connect. This can mean that Smaart remembers the device, but it is not currently connected. Alternatively, if the device is present and connected, this can be indicative of a hardware or software problem preventing Smaart from communicating such as a hung device driver, a loose cable, or perhaps the device has become unresponsive and needs a reboot.
You can remove an N/C device from the list by selecting it and clicking the Remove button below the devices table.
On Windows, there is a Refresh button to the left of Remove that will prompt Smaart to re-check for new device connections (and disconnections). The MacOS version of Smaart performs this check continuously while open, so this button isn’t present.
Configuring Output Channels
Below the devices table is another table listing the individual channels for the selected device in the table above. Notice that a new tab is added to the channels table for each device that you designate for use. In this case, the layout of the table depends on the device type selection (Input Devices or Output Devices) at the top of the page, but the only user-specifiable option for output channels is the Friendly Name which we have already talked about.
The Output channels table has typically has 5 columns:
To route signal to an output channel from the signal generator, check its checkbox in the Use column.
The Channel (Ch) column lists channels by number as reported by the driver.
The Channel Name column lists the official (driver-reported) channel names. These are not editable.
Clicking on an input’s Friendly Name allows you to change its name as displayed within Smaart. Pressing the [Enter] key applies these changes and selects the next input on the list.
You can apply a relative output Attenuation to individual output channels by entering a value in dBFS in the Trim column – just type in the number of dB that you want to attenuate by and press the [Enter] key. Smaart will add the minus sign for you.
Below the channels table are two buttons whose functions are as follows:
The Clear Settings button will clear out and reset friendly names assigned to output channels to their driver-reported default names. (A warning message pops up first in case you click the button by accident.)
The Reset Trims button resets all output trim values to 0 dB.
Smaart Loopback
Replacing the Generator input device, the new Smaart Loopback feature enables any output selected for use to appear as an input channel for the same device. To enable Smaart Loopback, navigate to Config > I-O Config and select the Smaart Loopback checkbox. Once enabled, output channels become available in the input channel selection dropdowns for the output device.
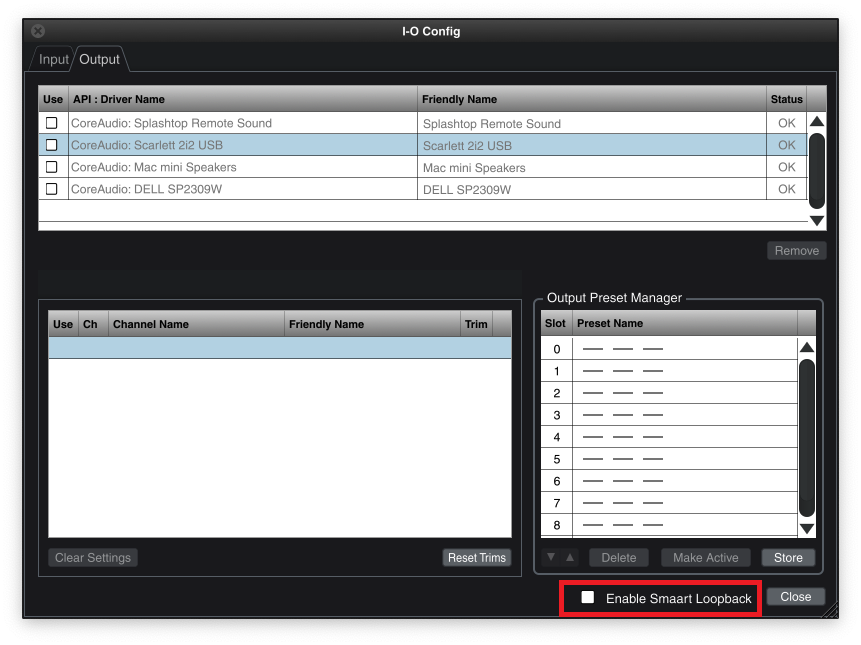
The Output tab of the I-O Config dialog featuring the Enable Smaart Loopback checkbox.
Note the Transfer Function measurement engines referenced to Smaart Loopback are not delay-compensated. The resultant delay times will be the Propagation Delay of the measurement, with additional delay between the USB buffers of the audio device in use and the Smaart Loopback channel.

Smaart Loopback channels displayed as Input channel options.
Output Presets
To the right of the channels table is a section labeled Output Preset Manager, with a table showing any output presets that you have configured. To create a preset, select the device(s) and output channels that you want to route signal to and trim the output channels as necessary (as described in the previous section), then click the Store button.
To recall a stored preset, select its name in the list and click the Make Active button. You can also do this by selecting your desired preset from the fly-up dialogue within the controls for the Signal Generator, which will read "Configure..." by default.
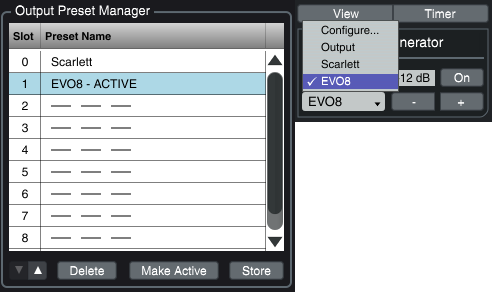
The Output Preset Manager (left) and an available Output Preset being selected (right).
Note that selecting the name of an existing preset in the Output Preset Manager table immediately “previews” it, by setting all device and channel “Use” selections and output trims to the states stored in the preset. However, these selections are not actually applied until you click the "Make Active" button. You can also recall an output preset by selecting it from the signal generator control section on the Control Bar in the main window. Output presets can be changed while the Signal Generator is active.
To delete a preset, select its name in the list and click the Delete button below the table.
To reorder the preset list select the name of a preset that you want to move and use the up/down (▲|▼) buttons below the table to move it up or down to a different storage slot.